Green Living Organics (.org)

Sustainability through healthy living

   Dec 17

Oatmeal Cookies with Chocolate Chips!

It’s cookie season! I love cookies. My favorites are oatmeal cookies, but I don’t like raisins. They’re like wasted grapes and just make me sad. I think they’re the only dried fruit I dislike, but it’s tragically hard to get oatmeal cookies without raisins. Here’s a great recipe that replaces those tragic little post-grapes with delicious chocolate chips! You can put raisins in if you’d prefer, though.

And if you’re wondering about all the cute little pictures, you can click them to find the items, or just bounce on over to our store and load up on every tool you need.

Ingredients:

1 1/4 cup  butter (I like the big chunks of Amish Butter I get at the food co-op)
1 teaspoon baking soda
1 teaspoon salt (I usually only have big sea salt, but we recently got a salt grinder. It takes FOREVER to grind 1t, so I generally put in however much I get before I get tired of grinding)
4 teaspoons REAL vanilla extract
1 cup firmly packed brown sugar (brown sugar is key for the yummy chewiness)
2 eggs (best if you can grow them on your own, otherwise, find a cool local farmer and get the good stuff, not those sad little pale yellow store-bought suckers)
1 1/2 cups firmly packed all-purpose flour (unsifted)
10 ounces of semi-sweet chocolate morsels (I just fill a bag at the bulk section and dump in as many as feels right to get the perfect cookie to chocolate ratio.)
3 cups actual oat not the instant or “quick” kind

You can also add:
nuts, almond extract, cinnamon, nutmeg

Kitchen Items:

mixer

(if you use melted butter, you can mix by hand in which case you’ll need a wooden spoon)

measuring cups & spoons

cookie sheet

cooling rack

oven mitts

a great big FLAT spatula

an oven

Directions:

1. Put your oven shelf in the middle of your oven. Be sure to do this BEFORE moving on to step 2.

2. Pre-heat the oven to 350 degrees Fahrenheit.

3. If you want flatter cookies, melt the butter in a sauce pan. We have the perfect little pan for this.

If you want them fatter, just throw the butter into the mixer.

4. Add baking soda, salt, vanilla, brown sugar, and eggs and mix on low-medium low until it’s all smooth. You should probably pause to taste it, unless you’re weird about raw eggs. I am not.

5. Put the mixer on low while your add your flour, oats, chocolate morsels, and anything else your little heart desires. If you leave the mixer too fast, you’ll get flour everywhere which makes for a funny scene for a movie but a big mess for those of us without a clean up crew. You may want an apron just in case.

6. Using your mad skillz from youthful clay and playdoh escapades, roll the dough into small balls, 1 – 1 1/2 inches in diameter. You can make them into bigger balls if you want bigger cookies, but you may want to flatten them a bit so you don’t get burned edges and raw centers.

6b. If you don’t want to make all of the cookies now, put whatever cookies balls you don’t need onto a cookie sheet and into the freezer. When they’re hard, you can put them into a container. I like a wide mouth mason jar that I can vacuum seal.


7. Place the cookie balls that have pleased you enough to be eaten immediately on an ungreased, non-stick cookie sheet with at least 2 inches between cookies.

8. Bake the cookies for 7 – 10 minutes, until the edges just start to turn brown. You can spin them mid-way if you don’t think your oven will bake evenly. If you over bake them, they’ll be crispy, which you may like. I prefer my cookies chewy.

9. Carefully remove your cookies from the cookie sheet and put them on the cooling rack thus opening your cookie sheet for the next batch!

10. Share. Or don’t. Either way, be sure all of the cookies are eaten since there’s nothing sadder than wasted cookies.


   Dec 06

Claire’s “Oh Snap” Dip

OK, so let’s say you are getting ready to go to a party for a friend and you need an appetizer. Usually I would take my fabulous hummus, but let’s say I’m gathering my ingredients and can’t find the garbanzo beans (the key ingredient). That’s when we get creative and make up (on the spot no less) “Claire’s Oh Snap Dip.” First go to the pantry and fridge and find items that would go well together, then throw them all into a blender and there you go. We had tofu that Nathan won’t eat and a ridiculous number of jams open in the fridge which is where this recipe began to take shape…

ingredients/supplies:

1 small blender/mixer/food processor type machine

1 package of Tofu (I used extra firm, it blends up smoothly. soft would make a nice creamy spread. If you hate tofu, which really you shouldn’t because it has no flavor of its own and makes a great healthy base, you could substitute cream cheese or sour cream)

1-2 spoonfuls of Feta (ricotta would probably do. Just something to give it a kick)

1-2 spoonfuls of Jam (I used apricot jam because the peach jam lid was too tight. Thanks Nate!)

Enough Cinnamon (there’s no such thing to me, but I think I may have used too much. Maybe)

A dash of Nutmeg (or more if you like it)

A sprinkle of Cumin (again, for that kick)

Another sprinkle of Ground Ginger (did I mention kick?)

Like I said, just throw it all into the blender and mix until smooth. Then put it into something pretty (or a mason jar if you’re transporting it and threw out all of your #5 plastic tupperware) and away you go. I think Ginger Snaps would have been great with it, but sadly, all I had was the flat bread I wanted to use with my hummus. People ate it anyway and told me it was good. Also, be careful where you take it when divulging the ingredients. I’m surrounded by Tofu-haters, so I generally leave that little tidbit out until they have already admitted to loving the dip (HA!).

Here’s a little twist to make a savory dip (that goes great with crackers or bread) rather than a sweet one:

replace Jam, Cinnamon, Nutmeg, & Ginger with Garlic & Basil and save a pretty basil leaf to put on top. Keep the Feta though because “Feta makes everything betta.” 😀 Happy dipping!!


   Nov 24

Traditional Thanksgiving Drink

OK, it’s Thanksgiving and you’re reading my blog. That means that either your totally addicted to my brilliant musings or you’re not having a fabulous time with the fam. In case of reason number 2, here is a drink that is sure to make your Thanksgiving fly by (please arrange for a DD)

Thanksgiving Margaritas

1 Can of Limeade (I just use the generic brand, but you can get fancy if you want)

1 Lime worth of zest

1 Lime worth of juice (yes these can be the same lime)

1/2 Limeade Can full of Tequila (or a full can for “extra spicy” margaritas)

2 Shots of Triple Sec

Ice

You can make this in the blender for frozen margaritas or just mix it all up and serve over ice. I don’t salt my glass, but if you want to, you’ll need some salt (duh).  So, here comes the hard part. Dump all of the ingredients together into either a blender or a pitcher (or a really big glass if you’re a nut job and want to drink this all by yourself. Please have a puke bucket nearby because you will get sick. It’s friggin’ tequila, people.)  Blend or mix until it looks right. Drink. Enjoy your holiday.

Some additions that I’ve found to be delightful:

Orange Juice

Pomegranate juice or liquor

Oh, hell, any old juice will do if you’re looking to make something a little different (or disguise your drink from Granny. Now, I don’t have to disguise my drink.  My Granny is the one giving handles of bourbon for Christmas.  Go, Granny!)

I’ve digressed.  Perhaps I shouldn’t be tasting the recipe while blogging. HAPPY THANKSGIVING!  (oh, this could also be known as the Thanksgiving Diet. Drink too many margaritas and you won’t have to worry about that extra 5-10 pounds of turkey weight.)

 
And a little tool to make things easier:


   Nov 09

25% off my favorite sneakers!

I love Simple shoes. They’re comfy and earth friendly and wallet friendly. And right now, their even wallet friendlier. Follow this link for 25% Off Women’s Shoes at SimpleShoes.com! or follow this one for 25% Off Men’s Shoes at SimpleShoes.com!

Then send me pictures of your cool new shoes so I can be all jealous. 😉


   Nov 06

Paw Paw’s Fruitcake

This recipe comes from my grandmother’s cookbook (my dad’s mom). Well, it’s hand written in the back of the book. And by book I mean pamplet from the International Associate of Machinists and Aerospace Workers. It’s the only cookbook she had as far as I know. Anyway, I’m getting off topic. A friend recently posted on Facebook that she wishes she had a good fruitcake recipe. This is the best one I know of, so here goes:

Ingredients

2 C Flour

1 C Sugar

1/2 lb Butter

1 lb glazed cherries (whole)

1 lb glazed pineapple (cut in large chunks)

4 C Pecans

5 Eggs

Lemon Extract (about 2 t)

Vanilla Extract (about 2 t)

Optional (if you want to make it for my mom’s side of the family): Manischewitz wine (or Jack Daniels if you put my mom in charge of liquoring it up)

I didn’t say it was good for you, just that it tastes good. To make it seem healthier, I recommend switching the glazed fruits for dried fruits. I love dried ginger, apples, pineapple, peaches, apricots. Pretty much any dried fruit will do. Honestly, fruitcake is meant to be experimental, so try some different nuts or fruits or whatever (just no raisins. Those things are nasty! Wasted grapes in my book. Well, if you like raisins, I guess you can ruin your delicious fruitcake with their creepy raisininess. Sigh)

Also, the estimated extract measurements are pretty standard for my grandparents (I would be linking Maw Maw’s cornbread recipe here except it seems I haven’t written that post yet. How tragic! I’ll get right on that!). The fact that most of the ingredients have a specific measurement is pretty darn impressive.

Equipment:

Loaf pan (or cookie sheet if you want to go free form) – this can be a full-sized or some of those mini-loaf pans. OR try those new-fangled brownie pans. I think the crust is the best part, so let’s maximize it!

An oven (duh)

Brown paper

Mixing bowl and mixing utensil/appliance (my grandparents did all their mixing with a fork. Back in their day you didn’t have those fancy mixing machines! No sir! You had a fork and you were happy about it! OK, they never pulled any of the old codger “back in my day” stuff, but they DID use a fork for mixing. I don’t even know if they owned an electric mixer)

Chopping tools (unless you get the pre-chopped nuts and fruits)

Now for the actual making part:

Mix butter & sugar.

Add eggs one at a time, beating well.

Add lemon & vanilla extract.

Mix fruit and nuts with flour until thoroughly coated.

Mix in butter mixture.

Line pan with brown paper, greased and floured.

Bake in large tubular pan for one hour, 15 minutes at 350 F. If using smaller pans or 1 lb pans, bake at 300. You can also make cookies by dropping delicious globs of dough onto a greased cookie sheet. They cook for a whole lot less time. I’m not sure how long, so just keep an eye on the first round and do the rest just like that.

Now for the fun part. You can eat it straight from the oven (I recommend doing this with at least some of your cake) OR you can live dangerous and soak it in liquor. DO NOT PUT MY MOM IN CHARGE OF THE LIQUOR!!** WOWEE! When she said she’d soak it, she really meant it. I think my grandmother (mom’s mom) REALLY loved it, but she’s big into bourbon (as in she has been known to give out handles for Christmas. I love my Granny).

OKAY, so the soaking takes a bit of prior planning as you want to let the cake get soaked through. I’d say a week? I really don’t know. I think mom did it for the month between Thanksgiving and Christmas. But you can use a variety of liquids. Bourbon may be a bit much (unless you love the stuff like my family does). Paw Paw always used Manischewitz wine. You could probably use Amaretto to sweeten it up. Just be experimental and let us all know what you tried and how it worked out in the comments!

**A consolation to my mom, that was the first time we’d tried the recipe and she didn’t want to mess up and under-do. I’m sure she’d do a much better job this time. Especially since she reads this blog and hasn’t bought my birthday OR Christmas gifts yet. I LOVE YOU MOM! :)


   Oct 22

Awesome wheat flatbread

When Nate isn’t around, it’s kitchen experiment time. I make things like butternut squash/sweet potato/peanut butter mushy delicious (like a curry, but totally just made up) and of course need flatbread to go with it. I didn’t record the recipe as I made it, so this is going to be a bit like getting a recipe from my grandmother, but here goes anyway.

3 heaping 1/3 cup measures of whole wheat flour

some yeast (maybe a teaspoon or two?)

a heaping spoon of sugar (like a big soup spoon, but not a giant serving spoon and not a little cereal spoon)

water (I’m guessing about 3/4 of a cup. Enough to make the dough doughy)

a sprinkle of salt (I used large seasalt, not tiny little salt crystals and took I think one big, three to four finger sprinkle)

fresh ground pepper (about a minute of grinding)

some olive oil


So now that the ingredients list is all cleared up, here’s what I did.

1. Put the yeast in a bowl with the sugar & water (usually you use water between 105-115 F to activate the yeast, but I had no patience for that and just got it straight from the tap. Well, from the water filter next to the tap). Mix them all around and wait until impatience gets you and then move to step 2.

2. Dump the flour in. Then the salt (don’t want to kill our yeast) and pepper. Mix it all up to make it doughy. I use my hands, but I guess you could be fancy with a mixer or something. I think that might be overkill for the amount of dough we’re making.

3. Form the dough into a ball so you can pick it up while you put some olive oil into the bowl (be sure to get all the doughy bits off the bowl sides before you put in the olive oil).

4. Rub the dough-ball around in the olive oil coating the bowl & the dough.

5. Leave the dough-ball in the bowl for a while. Hours I think. I got distracted by Cracked.com all evening so time lost it’s meaning. I put the dough into the oven with the light on to help it rise. When it wasn’t rising fast enough, I turned the oven to 170 F until it preheated then turned it off.

6. Lose patience and determine it’s risen “enough” (we are making flatbread here). Take the dough-ball bowl out of the oven. Preheat the oven to 400 F while you break the dough into sections & shape them and put them on a grease cookie sheet (I greased with more olive oil). I did 5 “loaves” and made them somewhat pancake shaped. I would show you exactly what they looked like, but I ate them before I got the camera out. Visually they look like dense pancakes BUT THEY TASTE NOTHING LIKE PANCAKES SO DON’T CONFUSE YOUR TASTEBUDS THINKING MMMM…. PANCAKES.

7. Bake for 10 minutes at 400 F.

8. Eat them ALL!!!! MWAHAHAHAHAHAHAHAHAHAHAHAHA


   Oct 20

Jalapeno Dip

I found this in my email.  Might I suggest trading the cream cheese for Kefir cheese and that Mayo for some sour cream?

4 – 8oz pkg cream cheese, softened
1 – 2c pkg shredded sharp cheddar cheese
1 – 12oz jar sliced jalapenos (chopped up more)*
Mayo (just enough to give proper dip consistency)
Combine above ingredients.  Serve with Fritos scoops.
*Add additional jalapeno juice depending on how hot you want it.
½ recipe to make a smaller quantity.

   Oct 14

Bread Recipe Alternatives

I am never happy just going along with someone else’s instructions, so I took a few liberties with the recipes posted earlier.

Here are a few changes I made to the original recipes. First, I wanted to half the Basic Bread recipe while making the changes (so I didn’t totally blow 2 loaves if it turned out awful. A kitchen scale might come in handy for this one.

Here is the recipe again with the changes in bold:

  • 1 package dry yeast (1/4 oz)
  • 3/8 C warm water (6 T)
  • 1 1/3 C warm water (105-115F)
  • 1/8 C Honey (replacing the sugar) (2 T)
  • 1/2 T salt (1/4 oz)
  • 1 1/2 T olive oil (replacing the shortening) (.75 oz)
  • 5 C all-purpose flour
  • 1 C oats (you will probably need a bit less flour thanks to the oats)
  • 2 T flax seed meal (just for fun)

As usual, start by dissolving the yeast and letting it proof. Put all of your ingredients (but only 2 C of flour) into a big bowl and mix until smooth. Add enough of the remaining flour to make the dough easy to handle (not a sticky mess)

Knead the dough on a lightly floured board (or with the dough hook in your stand mixer) until smooth and elastic (10 minutes). Put it in a big bowl that you have coated in olive oil, brush the top with oil and let rise (covered) until double (1.5 hours to let it get good and fluffy).

Punch it, divide in half, and roll it out into a rectangle (or shape into balls). Here’s where we get crazy again. Lightly coat the inside of the rectangle (that would be the upside since we’re rolling it into a loaf) with a mixture of honey & olive oil, then roll it into that tidy little rolled rectangle with all the seams sealed and put it into a greased pan seam side down (I don’t know that I have made a big enough deal about getting the rolling right. You want to roll it good & tight so you don’t end up with big air pockets in your loaf, unless you like that sort of thing). Brush the loaf with more oil & honey and let it rise for another hour.

Once your second rise is done, leave the loaf in the oven while you preheat it to 425F. Make sure your loaf is good and centered. Try putting the pan of water underneath for a softer crust. I’m guessing you could put oats on top, but I would wait until the bread is mostly done then brush it with more honey & olive oil to get the oats to stick. I’m thinking oats on top for the entire time might leave you with crispy oats, but I’m not 100% on that. Bake for 30-35 minutes until a deep golden brown you get a hollow sound when you tap it. Remove immediately when ready and start dipping into more of the honey/olive oil stuff for yummy times all around.


More alternatives:

For the Homemade Crusty White Bread, I also tried swapping out some of the flour. Instead of 6 C of all-purpose flour, I used 2 C stone ground wheat flour, 2 C white bread flour and 1.5 C oats. The rise times are different as well. Oh, hell, here’s the whole thing with my changes (which are in caps & bold):

  • 2 packages of active dry yeast (about 1/2 oz)
  • 2 C warm water 105-115F (to activate the yeast)-this part is kind of tricky. Too cold & the yeast doesn’t do anything, too hot & you kill it.
  • 2 T HONEY (to feed the yeast)
  • 1 T salt
  • 1/4 C salad oil (I use olive oil)
  • 2 C STONE GROUND WHEAT FLOUR
  • 2 C WHITE BREAD FLOUR (or wheat if you can find it)
  • 1.5 C OATS
  • 2 T flax seed meal (just for fun)

See above for dissolving & proofing yeast. It’s easy, just add water & honey. Put all of your ingredients (but only half the flours) into a big bowl and mix until smooth. Add enough of the remaining flours to make the dough easy to handle. I usually add 1/4 C at a time, alternating between the white & wheat. You will probably use all of the flour for once.

Knead the dough on a lightly floured board (or with the dough hook in your stand mixer) until smooth and elastic (8-10 minutes). Put it in a big bowl, brush the top with oil and let rise (covered) until double (2.25 hours, I think it’s the wheat that makes it slower).

Punch it, divide in half, and roll it out into a rectangle (or shape into balls) and shape it into that tidy little rolled rectangle with all the seams sealed and put it into a greased pan seam side down. Brush those loaves with salad oil and let rise another 1.5 hours (again, double).

These bake at 400F for 35 minutes and will again sound hollow when done.


If the loaves seem a bit dry, try adding more oil & water or throw some shortening in there for fun. Wheat flour acts different than white flour. It doesn’t usually rise as fluffy, so a bit more yeast might be helpful. Mixing it with white also helps you avoid the brick o’ bread syndrome. Wheat bread is just naturally denser. If you buy wheat bread at the store that’s white & fluffy, double check to make sure it isn’t really enriched wheat flour which is the exact same as white flour only dyed brown to make you think it’s healthy. You want WHOLE wheat flour.

Other fun things to add are dried fruits, herbs like oregano or thyme or rosemary, sweet stuff like cinnamon and sugar rolled in the middle, the possibilities are endless. I do not cook as if it is an exact science (my baker friend might argue, but I’m not a pro, so I’m not going to stress about it). If you have a fun suggestion, please post it! I’d love to learn a new recipe. Also, if you know the secret to soft loaf bread that makes good sandwiches & has a soft crust, I need it. We currently buy the country sourdough from the Produce Market on Sutherland, but I would love to make some bread that Nathan actually likes on sandwiches.


   Oct 10

Best Hummus Ever aka Claire’s Hummus

1 can of chickpeas/Garbanzo beans drained (keep the liquid in a measuring cup, we’ll use it later)
2 spoonfuls of Tahini
a quarter of an onion
as much garlic as you can stand (I used 4-6 cloves)
Cumin (quite a bit, perhaps several tbs, I just shake it in until I’m happy and then shake in a bit more)
Cholula (about 1/2 teaspoon?)
Pepper
Paprika
Chili Powder
Olive Oil

I think those are all of the ingredients. It varies, so feel free to experiment.

1. Dump the beans, tahini, garlic, onions, cumin, cholula, pepper, and enough olive oil to moisten everything into a food processor or blender.

Blend

2. You’ll now notice that you don’t have enough liquid. Start adding the chickpea juice a bit at a time, blending as you go, until you get the desired consistency. I like a medium liquidity, but some people like thicker or thinner hummus. Now is also a good time to add other flavors like olives, roasted red peppers, or anything else. You can also add these items later if you want them to be a bit chunky vs chopped up really tiny.

3. Taste it. Is it everything you’ve dreamed of? No? Add more cumin.

4. Once you have the flavor just right, dump it into a bowl. Pour more olive oil over the top and sprinkle with chili powder and paprika.

Serve with chips or flat bread (I buy mine at the Dekalb Farmer’s Market)

5. Bask in the glory of your culinary genius while everyone showers you with praise. Be sure to make it sound like a much bigger ordeal than 10 minutes of food processing time.

Happy Hummusing!


   Oct 06

Unfussy Apple Cake Recipe

or What to do with all of those apples Nathan hasn’t eaten yet.

This isn’t my own personal recipe.  Elizabeth sent it to me and it just looked so darn good.  I’ve included the link so you can go see the pictures and such.  I have a bowl of not-firm apples (Nate and I only like the really crisp ones for just eating, so I’m always looking for ways to use the older, softer ones). I figure as the fall continues on, we’ll be looking for more delicious things to do with apples.

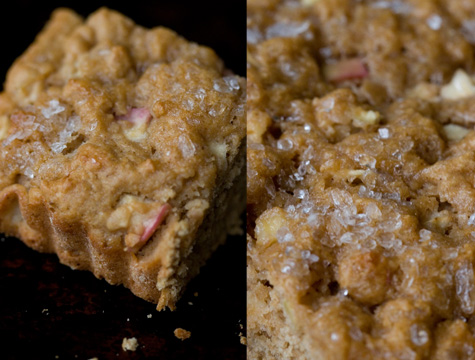
A big, floppy dollop of boozy, slightly sweet whipped cream takes this cake over the top. Wanting to keep this cake simple, I also had to restrain myself from adding any extra ingredients although I had a block of quince paste (membrillo) that would have been nice cut into tiny cubes and mixed into the batter, or caramel cut into little cubes, or toasted walnut or pecans, or, or, or…..I used a huge, flaked Japanese sugar on top of this cake (you can see it in the photo), but any big-grain sugar will help lend a nice crunchy, sweet, sugar crust. If you don’t have whole wheat pastry flour, unbleached all-purpose flour will work as a more conventional substitute.

2 cups sweet, crisp red apples, cut into 1/4 cubes (peel on)
2 1/2 cups whole wheat pastry flour
1 tablespoon aluminum-free baking powder
2 teaspoons cinnamon
1/2 cup dark Muscavado sugar (or other fine-grain natural cane or brown sugar), lump-free
1/2 teaspoon fine grain sea salt
2 eggs
1 cup buttermilk
1/4 cup butter, melted and cooled a bit
3 tablespoons large grain sugar

Preheat the oven to 400F degrees, racks in the middle. Butter and flour (or line bottom with parchment paper) one 9-inch square baking dish or tart pan, you can also bake it in a 9×13 pan but really keep a close eye on it after 20 minutes – it will be quite thin.

Place the chopped apples in a bowl of water along with the juice of one lemon. Set aside. Combine the flour, baking powder, cinnamon, sugar and salt in a large bowl. And in a separate smaller bowl whisk together the eggs and the buttermilk. Whisk in the melted butter. Pour the buttermilk mixture over the flour mixture and stir until barely combined – try not to over mix. Now drain the apple, shake off any excess water, and fold the apples into the cake batter.

Spoon the batter into the prepared pan, pushing it out toward the edges. Sprinkle with most of the large grain sugar. Bake for about 20-25 minutes or until cake is just set and a touch golden on top. I like this cake every-so-slightly under-baked, just barely, remember it will cook for a little while after you remove it from the oven.

Serves about 12.